7.21.2012

Foodbuzz Switching and Panda Trapped in Matcha Bread

Foodbuzz will Switch into Dailybuzz, sadly there are no content on dailybuzz that enable to us to update our blogger friends. I love all foodies on foodbuzz, so I feel very pity to know I will loss all of my friends and event I couldn’t enable to update their post.  
                                                       
Due to the situation I’m starting to following all foodies blog, let me know If I get through your blog to follow, I hope you guys are still willing to keep in touch with me too. If you guys want to follow my blog now I put Following gadget on the right side, so it could ease you by only clicking the following button. 


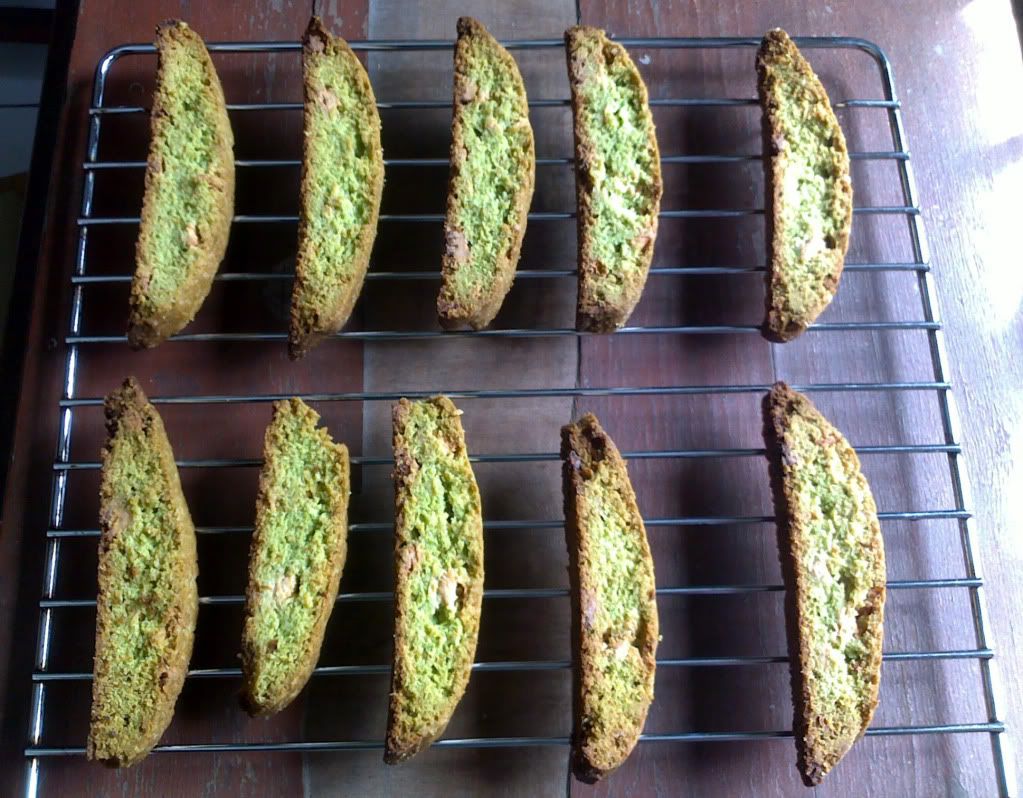
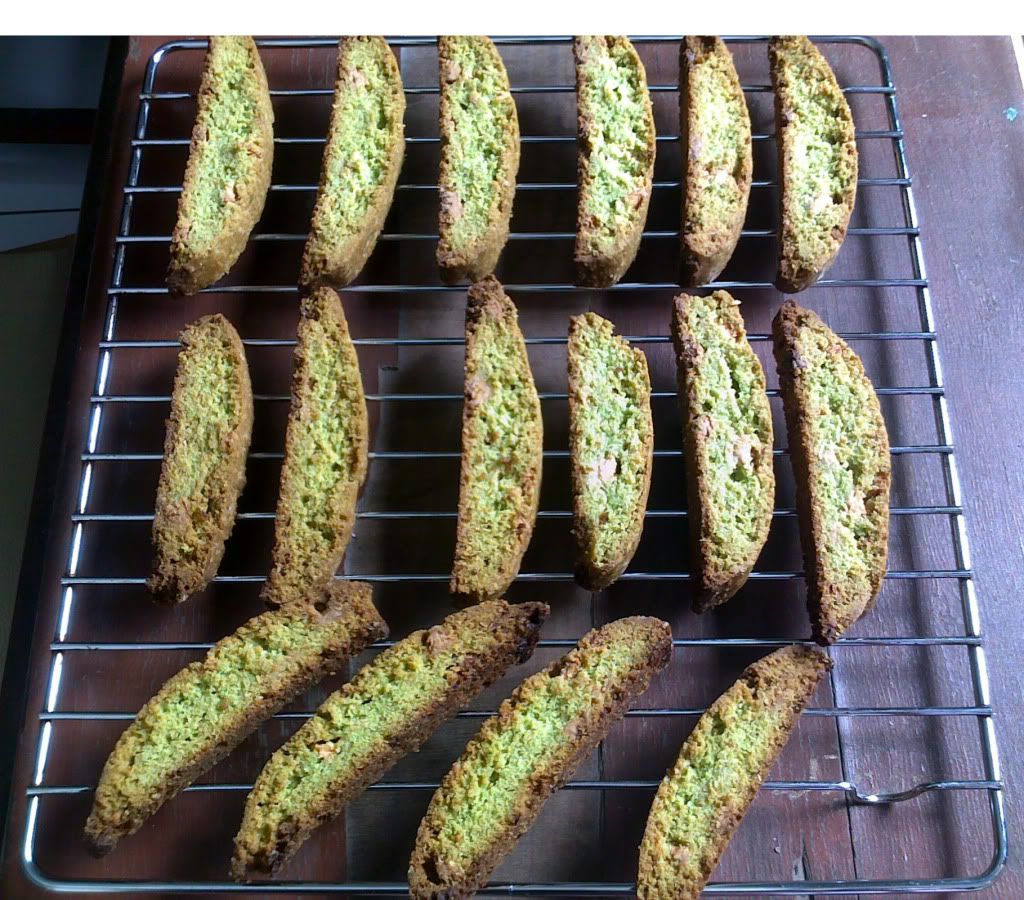
This weekend I will welcoming Ramadhan Month,  Every day during this month, Muslims around the world spend the daylight hours in a complete fast. For a whole month they fast from dawn to sunset, and offer additional prayers at night.

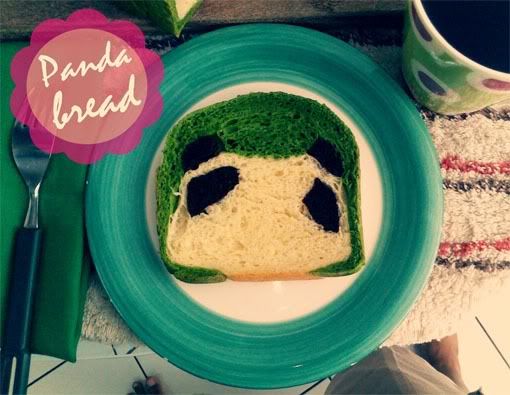
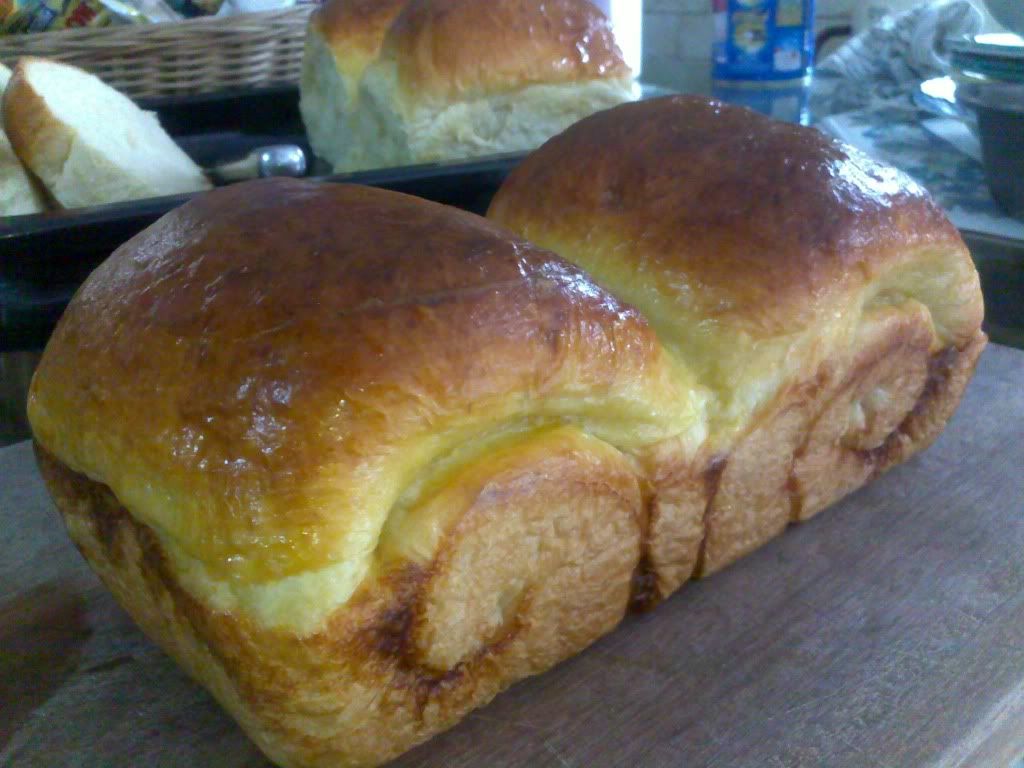
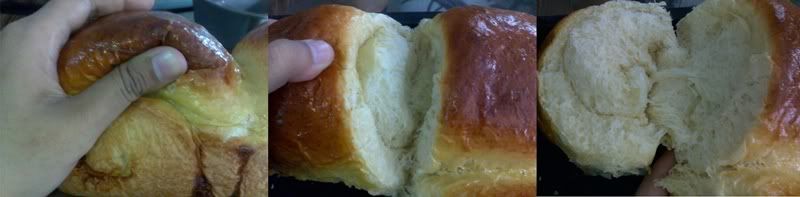
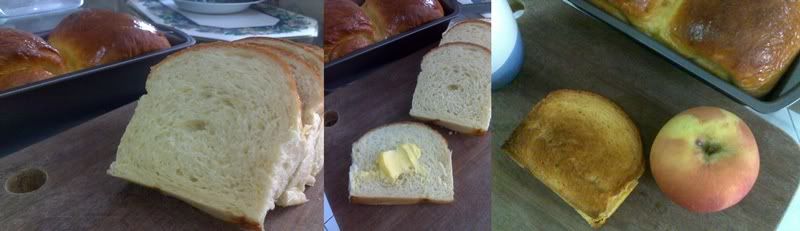
I decided to make these very cute Panda bread for my early breakfast (we used to ate at 2 – 4 am). I have plan to make french toast or sandwich with this cute bread. At Ramadhan Month when we must do the complete fasting we only have limited time to make and eat our breakfast so I think this is a great idea to preparing for our first fasting day.
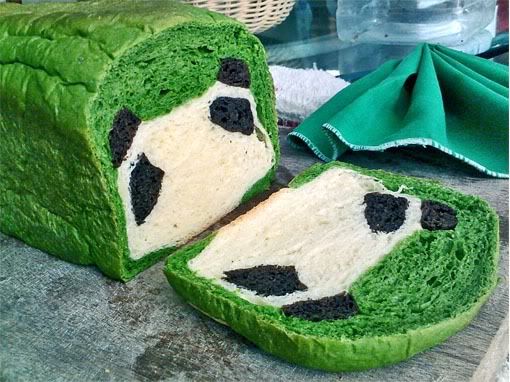
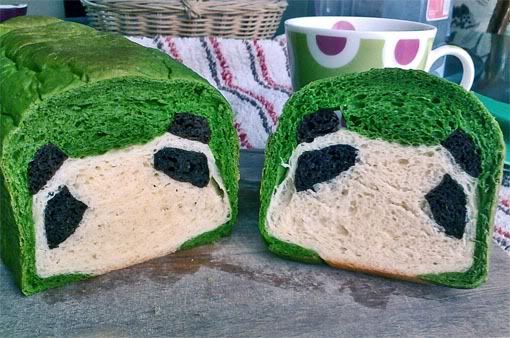


 Panda Bread Recipe
Adapted from: perfectpandas.com

Ingredients: 
600g loaf (206 x 108 x100h)
230g bread flour
70g cake flour
30g sugar
milk + 1 yolk = 210g (I used skim milk)
4.5g salt
18g unsalted butter (I used 20g)
4g yeast
8g green tea powder dissolved in 10g boiling hot water
8g cocoa powder dissolved in 8g boiling water


Method:
1. Heat up milk and yolk to temperature of 38C. (I beat the yolk lightly with milk and send it to the microwave on HIGH for 30 seconds).
2. Put everything in bread machine and set to dough cycle. Let it knead for 20 minutes. Stop the cycle and restart the dough cycle and let it knead for another 15 minutes.
3. Divide dough (about 560g) into 3 parts: 75g for the chocolate, 210g plain and the rest of the dough which is less than 280g for the green tea.
4. Add chocolate to the 75g dough and knead till the colour is even. Add green tea mixture to the 280g dough and knead till colour is even.

 5. Prove all 3 pieces of doughs on separate greased plates covered loosely with oiled cling wrap for 30 – 40 minutes.
6. Punch air out of dough and prove for another 20 – 30 minutes.
7. Use 90g plain dough for the face and 2 pieces of 27g chocolate dough for the eyes.
8. Fill the hollow of the eyes with 30g plain dough.
9. Roll remaining plain dough over the patterned dough.
10. Divide the remaining chocolate dough into 2 pieces (17.5g each) for the ears.
11. Use 70g of the green tea dough to fill up the hollow between the ears.
12. Wrap the rest of the green tea dough all around the patterned dough.
13. Place dough into a well-greased loaf pan and cover it with a lid and prove for 50 – 60 minutes in an enclosed area eg. microwave oven.
14. Bake at 200? for 25 – 30 minutes.

3.21.2012

Big Bang Manon Macarons & Japanese Matcha Biscotti

Yesterday I got packed from my best friend who lives in Jakarta. She promised me to  send second season of Big Bang Theory ( I know pals, this series now run in season 5, and I’m pretty late to follow this series, but better late than passing the gorgeous of Sheldon Cooper :D). First time I saw this series, seriously I don’t get it what they said,  everything what Sheldon and Leonard says they connect it with science. But thank to Penny, the only ordinary person on the gang, she’s like a guide for gazers who give the sigh which the sentences that Sheldon and friends says need to be ignore or note  :D. Moreover, those genius nerdy weirdos act with their social life are major “funnierd” (funny and weird haha…) don’t you laugh out loud when u saw the 1st season of episode where Raj and Howard trying to woo Sheldon hot sister  ;D? Well I really do!   

What about the macarons? Say it was bonus from my lovely dearest best friend, to accompany me watching The Big Bang theory. Basically Macarons having darn sweet taste that makes me losing my urge to eat it, but the Macarons from Manon chocolatier & patisserie that my friend sent it to me aren’t too sweet, it just precise, no wonder Manon macarons is happening in there. Thank a lot for my bestie

Exciting doesn’t make me losing my control to eat all the macarons in one night, beside they are to pretty to eat! I will eat and chew them slowly and make another  snack to company me watching Sheldon Cooper :P I was thinking to bake something easy  and no need much time to make it, and I decided to make…

DRUMS ROLL EVERYBODY…!!

Japanese Matcha Biscotti


Ingredients:
1/2 cup of butter, unsalted
3/4 cup granulated sugar
2 large eggs, room temperature
1 vanilla bean, scraped and pods discarded – or use 1 tablespoon of vanilla extract.
1+3/4 cups of flour
1/4 cup of green tea powder, also known as Matcha
1 teaspoon baking powder
a pinch of salt
1 cup of chocolate chips

Method:
Preheat oven to 350F or 180C. Spray baking sheet with some oil/coat with butter. Sift, the flour, matcha powder, baking powder and salt together in a bowl and set aside.
Cream butter with sugar until it turns into a pale creamy consistency. Add eggs, one at a time and mix well.
I like adding my flavoring in the butter mixture, I feel that it’s better incorporated that way. So, add your vanilla beans/extract in here and stir to perfume the butter mixture.
Now it’s time to add the dry ingredients; I like to add the flour mixture and the chocolate chips alternately into the butter mixture so it gets incorporated well.
With your spatula, half the batter and shape it into logs on your baking sheet. Flatten it until it’s about 1 inch thick and approximately 9-inches in length. You will have two logs from this one batch of batter.
Bake for 30 minutes in the oven. After that, cool the batter for 30 minutes before slicing with a sharp knife. Slice the biscotti logs into approximately 3/4 inch thick cookies and bake for 15 minutes minutes in the same oven temperature.
Let the biscotti cool completely before storing.
I love this recipe because the amount doesn’t too much, the better is easy to shape in a  log and the texture just right, crispy and not too tough. I substitute the Chocochip with white chocolate chunk and cut the matcha amount, I only use 1 ½ teaspoon.  For next time I make it, I will cut little bit the sugar and add the matcha amount exactly like the recipe, so the color can be more bold  

3.12.2012

Hokkaido Milky Toast

Some of you might be too lazy making bread because you have to dealing with the inconvenience of kneading, proofing, and shaping the dough in your busy time, so am I. But in my spare time, when I only need myself to relaxing, I would make bread. Bread is like a temple for me, I could find peace when I knead the dough, there’s nothing that I’m thinking of other  than make the dough become elastic, and for a while, I will forget all of problem around my life.

From thousands bread recipe I have tried, I could say this is the best bread recipe ever.  This Japanese bread recipe can produce bread with super soft and fluffy texture with rich of milk flavor. There is a difference method to make Hokkaido milky toast than the basic bread. The key is to put water roux/tangzhong dough to the bread dough. The Water roux bring quite a lot of water content which can make the bread texture incredible soft and fluffy. 

The water roux dough is extremely sticky, and it’s a quite challenge for me which handle the bread dough by hand. You will not regret to make this recipe, because the result is comparable with time you need to spend to make it. 


Hokkaido Milky Toast
Aapted from: Christine's Recipe

Ingredients of Water Roux 
(The amount is enough to make two loafs)

50g bread flour
250ml water (could be replaced by milk, or 50/50 water and milk)

Method of making Water Roux

    Mix flour in water well without any lumps. Cook over medium-low heat, stirring consistently with a wooden spoon, whisk or spatula to prevent burning and sticking while you cook along the way.
  
       The mixture becomes thicker and thicker. Once you notice some “lines” appear in the mixture for every stir you make with the spoon. It’s done. You get the water roux. (Some people might like to use a thermometer to check the temperature. After a few trials, I found this simple method works every time.) Remove from heat.

Transfer into a clean bowl. Cover with a cling wrap sticking onto the surface of Water roux to prevent from drying up. Let cool. Chill in fridge for several hours. (I chill it overnight.) Then the water roux is ready to be used. (Note: When you are ready to use the water roux, just measure out the amount you need and let it rest in room temperature for a while before adding into other ingredients. The water roux can be stored up to a few days as long as it doesn't turn grey. If so, you need to discard and cook some more.) 

Bread Ingredients
Makes two loafs (each loaf tin size: 20.5cmx10.5cmx9.5cm)

540g bread flour
 86g caster sugar
8g salt
 9g full cream milk powder
 11g instant dried yeast
 86g whisked egg
59g whipping cream
54g milk
184g Water roux
49g unsalted butter, melted
 
Method (To make one loaf)

Add wet ingredients (except butter) milk, cream, egg, water roux, mix well until there is no lump, then followed by the dry ingredients (salt, sugar, milk powder, bread flour, yeast) knead it, When all ingredients come together, pour in the melted butter, continue kneading until the dough is smooth and elastic. The time of kneading is about 30 minutes. Then let the dough complete the 1st round of proofing, about 40 minutes, best temperature for proofing is 28C, humidity 75%, until double in size.

Transfer the dough to a clean floured surface. Deflate and divide into 3 equal portions (see picture 1). Cover with cling wrap, let rest for 15 minutes at room temperature.

Roll out each portion of the dough with a rolling pin into an oval shape. Fold 1/3 from top edge to the middle and press. Then fold 1/3 from bottom to the middle and press. Turn seal downward. Roll flat and stretch to about 30cm in length. With seal upward, roll into a cylinder. With seal facing down, place in the loaf tins to have the 2nd round of proofing, until double in size. The best temperature for 2nd round proofing is 38C, humidity 85%.

Brush whisked egg on surface. Bake in a pre-heated 180C (356F) oven for 30 to 35 minutes, until turns brown. Remove from the oven and transfer onto a wire rack. Let cool completely.

2.27.2012

Dry Baked Brownies

Hello there…
I’m back…Yaaiiiyyy!! I have been very busy few weeks ago to prepared commemorating the day of my mom was pass away, major busy actually because I prepare everything by myself.  But this year I’m pretty lucky, some of my out of town families, stay overnight at my house and they helped me to tidy up my furniture back at their places after the praying ceremony was over and in the morning surprisingly before I woke up, they already cleaning up the house and make their morning coffee and tea by their self!  How I’m so relieved that day, because I don’t have to in a hurry to prepare morning snack for the guests, because at 8 a.m. we have to go to mom’s cemetery. 

Speaking about snack I’m sure most of you my lovely blog readers :) would like, love and couldn’t resist the delights charm of BROWNIES, yaess… 

Some of you would prefer dry and a little bit bitter brownies, and others would prefer soggy and sweet brownies. For me I love any kind of brownies. I have trying some brownies recipe with many different taste cheese, vanilla, cappuccino and forth. 

According to me the basic brownies with much of chocolate taste whether little bit bitter or sweet are the best. I have two favorite brownies recipe, the dry one and the soggy one. Today I will share the dry one brownies recipe, this is different from brownies bar or cookies, in case you will imagine that this is brownies cookies or bars, this brownies texture is much dry then the soggy one but not too dry like the cookies or bars.

 
What you need:
150g margarine
300g sugar
150g eggs
120g cocoa powder
105g all-purpose flour
8g baking powder
10g vanilla extract
100g sliced almond

Preheat oven 200°c
Shift flour, cocoa powder, and baking powder
With mixer, mix margarine and sugar until light and creamy
Add vanilla extract and egg one at a time
Add flour and cocoa mixture, mix until combine
Pour the batter to 8 inch square pan which already coated with margarine
 sprinkle with sliced almond, bake for 20 minute. 

PS.  I made that Brownies on the pic, when my friend asking me to made brownies for asking apologize to her fiance, now they are married and waiting their baby to come into the world :)